The keyboard mod for the AS3k is what makes it one of the best distraction-free writing devices one could hope for. The membrane keyboard it comes with is, unfortunately, sorely lacking – however, this prompted the invention of the awesome keyboard mod in the first place! If you’re a fan of mechanical keyboards, you’re going to love your modded AlphaSmart.
Some time ago, the entire ‘kit’ that one would require to build this was available on LazyDog’s website. This is no longer available, but some community members have made efforts to document instructions. This page is just another version of said instructions, with my own insights sprinkled throughout.
What you’ll need
Parts
You will need a PCB and a few electronics parts. The PCB (printed circuit board) is one of the biggest hurdles, since you have to have one custom made and wait for it to ship from China.
You can get the PCB from jlcpcb.com. This link should add the correct part to your cart, but if it does not, you can go to their home page and upload this gerber file. The minimum quantity is 5, and shipping can cost a pretty penny.
The remaining electronics parts are in my project on mouser, you should be able to simply order them together.
LazyDog talks about how the design was made here.
Keyboard
Aside from the above, you’ll need key switches and keycaps. This is where you get to customize your typing experience, as well as the look of your AS3k.
This is what you need to finish the keyboard:
| Item/Size | Qty. |
|---|---|
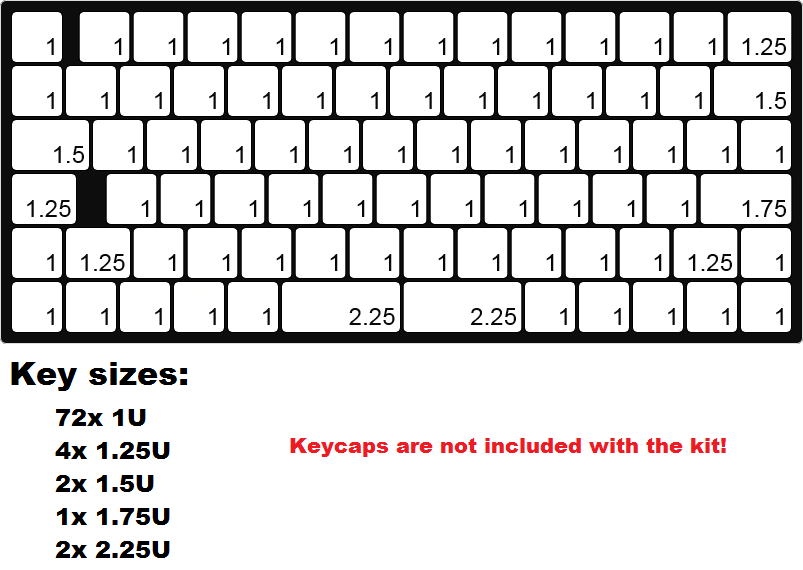
| 1U keycaps | 72 |
| 1.25U keycaps | 4 |
| 1.5U keycaps | 2 |
| 1.75U keycaps | 1 |
| 2.25U keycaps | 2 |
| Key switches | 81 |
This image shows how these keys will be laid out on your AS3k:
I’m partial to Gateron Browns, but you might wish to get different switches based on your preference — additionally, I found the five-pin variety to be much easier to align and straighten than the three-pin variety. As for the keycaps, you can get any set you like, keeping in mind the keycap sizes above and the profile, which should be either DSA or XDA (i.e., unsculpted). You can find plenty of such sets on Amazon.
Deconstruction
Munk has an excellent guide on pulling apart your AS3k.
Construction
The construction is fairly straightforward if you know how to solder, but if you need extra help there is a guide here. Personally, I find the “stabilizers” to be optional, so I haven’t mentioned them here at all.
Note: a mistake I usually make is trying to insert the smaller ribbon from the keyboard into or above the guard of the holder…it actually goes under it.